In this article, I will explain how to clean a Carburetor? Cleaning your vehicle Carburetor can be tedious if you don’t know the correct process of cleaning.
Procedure to Clean the Carburetor
- Detergent dilution: Use a detergent to ease the carburetor. Mix the diluted detergent in a huge tank. But you should use a non-corrosive detergent that cant harm the rubber or plastic elements of the carburetor. Use of Bleach: Don’t use vinegar, as acetic acid could make metals greater susceptible to oxidation. Also, do now no longer use bleach, as sodium hypochlorite (bleach) assaults metals which include aluminum and metal, and damages the rubber seal.
- Clean the air filters: Before cleansing the carburetor, easy the air filters and make certain that the air coming into the carburetor consists of no dirt and different contaminations.
- To easy the filters, detach the spark plug wires (if equipped) and flip off the gasoline supply. Remove the casing and wing nuts connecting the clear out, and take away the outside components. Use an air blower to blow air into the clear-out and take away the dirt.
- Detach the carburetor: Use a screwdriver and pliers to detach the covers and guards, in addition to the hoses and linkage. You should additionally take away all different clamps or cowl that restore the carburetor in its place. Also, disconnect the hose clamps connecting the gasoline line to the carburetor. After this kind of process, detach the carburetor and use a blower to blow compressed air to take away dirt from its housing.
- Removal of the carburetor flow: Detach the fastening screws of the carburetor flow (bowl-formed container) and ensure that no residual fuel line is sprayed withinside the flow (eliminate properly). Remove the pin that rotates the flow and hold it in a secure place. Then detach the flow by pulling it at once from its housing.
- Remove all different removable elements: Remove all different removable elements of the carburetor for its cleansing. Remember the location and place of all of the detachable elements so you can without problems reinstall them at their specific locations.
- Soak and Scrub Parts: Soak the carburetor flow and different elements in a huge tank of diluted detergent and allow them to immerse for up to eight minutes. Wash all plastic elements with the use of a stiff nylon brush and steel elements with the use of a brass brush. Be certain to ease the small airflow holes. You should additionally use the diluted detergent approach to ease the alternative small elements.
- Rinse and Dry: Rinse all of the elements of the carburetors through the use of an easy water bowl and dry them completely. To take away greater water, use a blower to blow dry compressed air from the small holes and vents.
- Reassembly and replacement: Carefully reassemble the carburetor and stable it to the engine. Reconnect all cables, clamps, gaskets, and hoses to their locations.
How to Clean a Carburetor Without Removing?
- Put on defensive gear, transfer off the engine, and dispose of the air clear out housing together with any hoses and linkages and the lowest bowl.
- Vacuum away any unfastened dirt, dust, debris, grime, and top-notch the floor with a hand-held and cordless vacuum.
- Lay out rags or cloths at the bottom of the carburetor to trap runoffs and defend the surfaces.
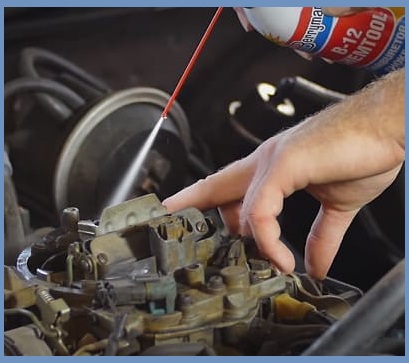
- Apply the carburetor and choke purifier in thin, even coats. Then, watch for it to settle and paint its magic.
- Wipe the grime away together with the cleansing answer carried out the usage of a microfiber towel and further assist from a stiff-bristle brush or a cord brush.
- Wipe the carburetor down with a fresh, dry towel and double-take a look at that it’s miles dried completely.
- Remove the rags or cloths at the bottom of the carburetor and different gear to run an overall performance take a look at the engine.
- Return the air clear-out housing, backside bowl, in addition to hoses, and linkages to their unique setup.